

game description
Breakaway: System Malfunction is a first-person, parkour action game that I was contracted to help develop. It takes place in a sci-fi dystopian future. The player's character has mysteriously "awoken" from his programming and his one goal is to escape. Upon his awakening, authorities and security measures are immediately activated and pursue him.
The player can parkour their way over hazards and around enemies, or attack them using projectiles or close-quarters combat. While the player can instantly kill most enemies, they too will be eliminated after taking any damage.
The game features a variety of video settings including DLSS as well as mouse settings that will be saved and loaded. Currently, players can enjoy a tutorial level and one campaign level.
gameplay trailer
PARKOUR PLAYTHROUGH
COMBAT PLAYTHROUGH
TUTORIAL PLAYTHROUGH
C++ and Blueprints
PARKOUR
All parkour mechanics were made using Blueprints either within the player character blueprint itself or in separate character component classes that were then applied to the player character blueprint. The core parkour mechanics include Dashing, Vaulting, Wall Running, Grappling, and Sliding.
DASHING showcase


click to examine blueprint structure
images may take a moment to enhance when magnified
Blueprint explanation
Pre-Dash:
I set up a timeline to zoom the camera FOV when the player activates the dash key in mid-air. In a tick event, global time dilation is slowed to .25, and a widget timer is added to the player’s screen to indicate time left in slow motion. When the player releases the dash key, a series of checks are made to first determine whether the player is in mid-air, is holding certain movement keys, in mid-air or grounded, or is looking up at a certain angle and moving forward if grounded. Each of these checks will determine what type of dash they will perform.
Dash Types:
The three types of dashes include; a directional dash with no vertical influence which occurs when the player is holding sideways or backwards movement keys, a forward dash with no vertical influence if the player is grounded and is either pressing the forward movement key or no key at all, or a forward dash with vertical influence if the player is either in mid-air or grounded and looking up above a certain angle.
Perform Dash:
During each dash type, a line trace is created from the player’s position to a predefined distance created by multiplying the player’s forward or last input vector (depending on the dash type) by a float I called ‘Dash Force’, or into an object if the line trace is interrupted. I used a timeline to linearly interpolate the player’s location to the end of the line trace (or hit if interrupted). I set the player velocity to either the forward or last input vector depending on the dash type. This phase of the dash also handles particle, sound, and camera shake effects.
Dash Attack:
When the player presses the dash button, it sets a boolean variable ‘IsDashing’ to true which will be reset to false when the dash is completed. While ‘IsDashing’ is true, any enemy, turret, or exploding barrel will be destroyed when overlapping a collision box around the player.
Vaulting showcase
click to examine blueprint structure
images may take a moment to enhance when magnified


Blueprint explanation
I've created a character component for the vaulting mechanic which I then applied to my player character blueprint.
To start, I've created a function within the vault component called "Can Vault" that constantly performs a line trace in front of the player every tick of gameplay. If there is an object in front of the player and that object has been assigned a ‘vault’ tag, the function will perform three checks in the “Can Vault to Hit” function to determine whether the object can be vaulted. I added this tag check so that I could manually determine what actors in the level can be vaulted.
In “Can Vault to Hit”, the first condition uses line trace to check whether the height of the object is too far above the player to vault, the second condition uses a built-in function to check whether the top of the object is a walkable surface, and returns false if it is not, and finally checks whether there is another object above the object in question and if it will overlap with the player’s capsule if they vault. If all checks pass, a widget will be added to the player’s viewport explaining they must press space to vault.
When the player activates a vault, the “Tick Vault” event will be called where each tick of gameplay I divide delta seconds by a float I’ve called “Vault Speed”, add it by a float I’ve called “Vault Progress” containing a default value of zero, and clamp the value to between 0 and 1. I use the value of “Vault Progress” to linearly interpolate between the player’s start location and the end location of the vault. This end location was obtained from the hit of the line trace performed during the “Can Vault to Hit” phase.
Wall Run Showcase


click to examine blueprint structure
images may take a moment to enhance when magnified
Blueprint explanation
When the player’s capsule component hits an object, it checks whether I’ve assigned it a ‘WallRun’ tag and whether the object can be wall ran in a function I named “Can Surface be Wall Ran”. This function determines whether the object is walkable, by comparing the angle of the object’s surface that the player capsule hit to the angle of a built-in function called “Get Walkable Floor Angle”. If the former is less than the latter, that means the player cannot walk normally on that surface and therefore should perform a wall run. If this is true, the script moves on to the next series of checks.
The player must be in mid-air to wall run. If this is true, the next function “Find Run Direction and Side” will determine which side of the player the wall is on. It checks whether the 2D (XY) right vector value of the player is similar to the 2D vector of the impact point where the player collided with the wall. I obtained the dot product between these two values, so any values greater than one mean that the wall is to the right of the player, and is otherwise to the left of the player. Then I obtained a “Wall Run Direction” vector, which is perpendicular to the impact point of the player and wall. The cross product of the hit impact normal and wall side vector. The wall side vector is either (0, 0, 1) or (0, 0, -1) depending on whether the wall is to the right or left of the player, respectively. The last condition needed for “Begin Wall Run” to be called is for the player to be holding the forward movement key.
The “Begin Wall Run” event sets the player’s gravity to 0, constrains the player’s movement to the X & Y axes, so that they seem to “stick” to the wall, and plays a timeline that tilts the player’s camera slightly. The main function of this event is to play an infinite timeline which, upon each update, a function called “Update Wall Run” is called.
In “Update Wall Run”, a line trace is called from the player to the “Wall Run Direction” vector we obtained from “Find Wall Side & Direction”. This function will update the value of that vector and whether the player capsule component is still colliding with a wall. If it is, the character’s movement velocity is set to the result of multiplying the max player speed to the “Wall Run Direction” vector to get the player to move along the wall in the intended direction.
If the player leaves the wall, the “End Wall Run” event will be called, resetting the player’s gravity value, releasing the plane constraint so they can move vertically again, and reversed the camera tilt timeline. The infinite timeline will also be stopped so that “Update Wall Run” will no longer be called.
grapple Showcase
click to examine blueprint structure
images may take a moment to enhance when magnified


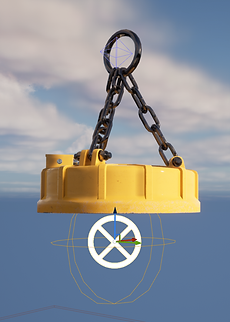
Grapple target in-game
Blueprint explanation
The grapple mechanic was built using four different pieces; a grapple hook blueprint, grapple line blueprint, grapple target blueprint, and finally a grapple component. The grapple component contains most of the scripting and was applied to the player blueprint once completed.
In the grapple component, I decided to use a tick functions to constantly update the grapple state. The grapple has four states; retracted, firing, nearing target, and on target.
In the “Tick Retracted” function, the grapple component creates a sphere collision around the player to determine whether the player is near any grapple targets, performing a function called “Find Best Target” to find the closest target to the player. “Find Best Target”, cycles through a list of all available targets and creates a line trace from the player to the target. Then, I check whether the player is looking in the general direction of the target by collecting the dot product of the vector between the player and target, and the forward direction of the player camera. If there is no “Best Target” already assigned, the current target in the list will become the new “Best Target”. If there already is a “Best Target” assigned, I compare the previous value to that of the “Best Target”. If the current target’s angle is smaller than the “Best Target’s” angle, the current target becomes the new “Best Target” in a function called “Set Current Target”. In this function, the current target uses a function in the grapple target blueprint that “activates” the target, making it visible to the player.
In the “Tick Firing” function, I launch the character slightly above ground level (such that they don’t notice) because the player must be in mid-air in order to be affected by a grapple boost. This happens once the grapple hook fired from the player gets close to the grapple target.
In the “Tick Nearing Target” function, after checking whether the player is in mid-air, I set the unit vector between the player and the target in a vector called “Initial Direction”.
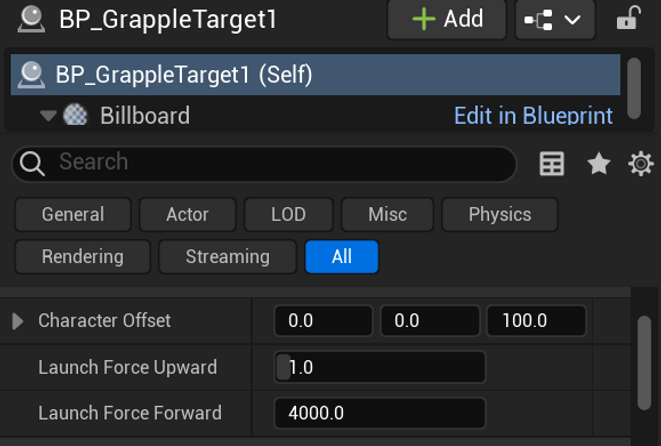
In the “Tick On Target” function, I launch the character using the product of multiplying “Initial Direction” by two launch floats that can be customized for each grapple target. These values affect the forward and vertical force of the grapple boost. The grapple line and hook are destroyed once the character is launched, and the grapple state is set back to “Retracted”.
When the player sees a grapple target appear, they can press ‘E’ to call an “Attempt Grapple” function in the grapple component. This function spawns a grapple hook, then spawns a grapple line, attaching one end to the player’s arm and attaching the other end to the grapple hook. When the grapple hook is spawned, I obtain the unit vector between the hook and the grapple target, then multiply it by a float “Grapple Fire Speed”. I use this value as the hook’s velocity. In a tick event, after checking whether the hook has reached the grapple target, its location is updated. To do this, I add the hook’s start location to the result of multiplying the unit vector of the start location and grapple target location by the distance between the start location and grapple target location.
grapple target editable properties
sliding Showcase


click to examine blueprint structure
images may take a moment to enhance when magnified
Blueprint explanation
The player must press the crouch key while moving forward to slide. When the player crouches, a timeline is activated, shrinking the player’s capsule height, and setting the location of the camera to follow the capsule height. This timeline gets reversed when the player stops crouching.
When the player performs a slide, an infinite timeline is started. Upon each timeline update, force is added to the player’s movement, influenced by the slope of the floor the player is on. In the “Get Slope of Floor” macro node, I perform a line trace from the character movement component to the current floor hit result. I get the normal from the hit result, calculate the slope of the floor, and multiply the result by a large float value. This method speeds the player up when sliding downhill. Then I constrain the velocity of the character to the direction of the movement. When the player’s speed reaches zero, the “End Slide” event is called, stopping the infinite slide timeline.
moving objects
I created the moving containers in my level by creating a series of actor components in C++. Using this method, I am able to attach this component to any actor in my level and modify its properties. I created a smooth movement, rotation, and scaler component as well as as a master transform component that combines all of these.
move & rotate components
Attaching the 'EaseMover' component to an actor will allow the user to add smooth movement to it. The user can change the duration of the movement animation, the end position, the start time, and whether the actor reverses when it reaches its destination or continues on moving in the same direction.
Attaching the 'MyRotator' component to an actor will allow the user to add smooth rotation to it. The user can change the duration of the rotation animation, the end rotation, the start time, and whether the actor reverses when it reaches its target rotation or continues to rotate indefinitely.
Scaler component
Attaching the 'Scaler' component to an actor will allow the user to add a smooth scaling animation to it. The user can change the duration of the scaling animation, the target end scale, the start time, and whether the actor reverses when it reaches its target scale or continues on scaling forever.
Master transform component
Attaching the 'MasterTransform' component to an actor will allow the user to use all three transform components on the same actor simultaneously.
explosives
I created an actor component that when attached to an actor, gives it explosive properties. Now the actor can take damage, catch fire, explode, and deal radial damage. The user can also easily change the health (hit points) of the component, the particle effects for the fire and explosion, radial damage dealt, explosion radius, and sound.
exploding barrel component
projectiles
I created a projectile actor class that served as a base for four unique player and enemy projectiles. The speed and damage dealt by the projectile can be edited
Player projectiles
Left click will cause the player to fire a fast projectile from their hand, instantly destroying regular enemies.
Holding right click will change the firing mode, indicated by the glowing area of the player mesh to change from green to red. Left clicking now will fire a homing missile that instantly kills enemies and deals radial damage. It does extra damage to the boss enemy.
Projectile C++ File


click to examine blueprint structure
images may take a moment to enhance when magnified
rocket jump
If the player fires a missile while looking at the floor at an angle while grounded, they will be launched backwards and vertically.
If the player fires a missile while looking directly at the floor whether grounded or mid-air, they be launched straight upwards.
If the player fires a missile in mid-air anywhere but directly below them, they will be launched opposite the direction they are facing
click to examine blueprint structure

images may take a moment to enhance when magnified
turret projectiles
The turret projectile is similar to the regular player projectile, but with modified speed and aesthetics, easily modifiable using the base C++ projectile.
More on the turret functionality in Enemies.
boss projectile attacks
The boss enemy randomly selects between three attack types; each with it's own projectile stemming from the base projectile created in C++.
One attack is a hand blast using the same projectile as the turrets.
The stomp attack spawns a large, slower, laser-like projectile that slides across the floor that is only used when the player is grounded.
The final attack uses the same projectile as the stomp attack, but scaled down, spawning from the eyes of the boss mesh.
More on the boss functionality in Enemies.
respawn SYSTEM
checkpoint, death & respawn
Upon spawning into the level, the player will be assigned a starting checkpoint. When the player dies, they will press 'E' to respawn back at that point. If the player overlaps another checkpoint elsewhere in the level, they will respawn at that checkpoint.
When the player receives damage, they will instantly die. A death screen will appear, time will slow, and input will be disabled (aside from pressing 'E').
When the player respawns, all enemies and explosive barrels are also reset to their original states & positions when the level began.
Respawn happens instantly so the player can get right back into the action.
click to examine blueprint structure


images may take a moment to enhance when magnified
enemies
running enemy
running enemy showcase
The running enemy has four states; attacking, investigating, patrolling, and death.
On a per instance basis, this enemy can either be assigned a patrol route based on a modifiable spline blueprint or if not assigned, will be remain idle until they hear or see the player.
If the player shoots a projectile near an enemy, they will go to investigate the source of the sound unless they see the player, in which case they will switch to the attacking state.
In the attacking state, the enemy will equip a baton and sprint at the player. If the player comes within range, the enemy will swing the baton to attack. Enemies can jump obstacles to reach the player.
When killed, the enemy will enter a ragdoll state and their baton, if equipped, will fly out of the enemy's hand.
Depending on what killed the enemy, a specified amount of force will be applied. For example, an explosion will send an enemy flying. On the other hand, if an enemy is killed by a player's normal attack, they will be slightly blasted backward.
patrol route showcase
The patrol route blueprint can be modified in the viewport. It automatically creates two points along a spline when it spawns, but you can create as many splines as desired and move them anywhere in the level.
Once the route is created, you must assign an enemy to it. The enemy has an instance editable variable that allows you to click and point to any patrol route blueprint in the level as seen in the video.
running enemy attack
When the enemy senses the player, they will equip a baton then start running towards the player.
When the player overlaps a collision sphere around the enemy, the enemies attack will be triggered. If the hurt box around the baton overlaps with the player, the player will be eliminated. When the player dies, the enemy unequips the baton and it despawns.
click to examine behavior tree/blueprint structure


images may take a moment to enhance when magnified
turrets
turret showcase
I've created floating and grounded turrets with modifiable properties including sensing range, rotation speed, and fire rate. I've separated the turret into two separate meshes so that I can rotate only the head of the turret.
attachment tool
I've added sockets to a shipping container mesh to attach grounded turrets to different areas of the mesh. Once attached, you can freely scale and rotate the turret, but its location will be locked.
click to examine blueprint structure


images may take a moment to enhance when magnified
boss
boss showcase
The boss enemy lets out a roar when it senses the player before it enters its attack state. It randomly selects from three unique attacks; a hand blast, foot stomp laser blast, and eyeball laser blast. The boss enemy will not use a foot stomp when the player is airborne. The boss takes more damage than regular enemies and cannot be damaged by dash or slide attacking. In fact, the player will be eliminated if they touch the boss mesh. The boss will explode during its death animation
click to examine behavior tree/Blueprint structure


images may take a moment to enhance when magnified
PYTHON TOOLS
editor utility widget

I made an Editor Utility Widget for easy access to all of the Python tools I created and commonly used. I've grouped tools into sections 'Materials, 'Tags', 'Spawnables', and 'Miscellaneous'.
spawnables
spawnables showcase
I've created a tool in Python to spawn in Blueprints that I commonly used including enemies & turrets, explosive barrels, grapple targets, hazards, launch pads, and checkpoints.
Clicking the respective button for a Grounded Turret, for example, will spawn the turret 100 units in front of the editor viewport camera.
This eliminates the need to open the content browser and find the exact blueprint.
Tagging
I've set up some of my blueprints to only function for actors in the level that have specific tags. Selecting an actor, then clicking the button titled Tag as 'WallRun' will add that tag to the actor. Now the player can attempt to wall run that actor
Wall run tag
vault tag
homing tag
custom folder
create a new folder
I created a Python tool that allows the user to quickly create & name a new folder for an imported mesh with two subfolders; one for the mesh(es) and one for the respective textures.
I used Tkinter to create the Graphic User Interface that allows the user to create a name for the folder.
materials
create new master materials
I created a tool that allows the user to create four unique master materials that are automatically populated with pre-built node structures at the click of a button.
misc
quick basic level creation
I created a few tools to create a new level with an atmosphere, floor, and spawnable spot lights with just a few button clicks
TECHNICAL ART
holograms
hologram showcase
hologram editing
click to examine material structure


images may take a moment to enhance when magnified
material parameter collections
boss laser charge attack
player toggle firing mode
The emissive (glowing) areas of the boss enemy's material gets dramatically brighter as they seem to charge their laser eye attack. After firing the attack, the emissive areas decrease their glow intensity back to normal.
When the player holds right click to toggle their firing mode, the emissive areas on the arms change from green to red. When the player releases right click, the color changes back to green.
click to examine material structure


images may take a moment to enhance when magnified
Hazards
hazards showcase
I created a sort of electricity heat distortion floor trap and a laser trap which both instantly kill the player. I've created instance editable materials.
laser material editing
floor trap material editing
click to examine material structure
images may take a moment to enhance when magnified
ai generated art
stable diffusion + PS generative fill
Billboards editable material
I used Stable Diffusion to generate 6 unique colorful designs then brought them into Photoshop to use the Generative Fill feature to expand them.
click to examine material structure
images may take a moment to enhance when magnified
I created a material that combines these designs with a glitch effect and arrows that indicate the direction the player should be going.
environment
trains & flying Cars
The game is set in the future, so I added some Sci-Fi looking trains and flying cars.
editable movement settings
Users can easily edit the movement behavior, end position, and speed in the details panel.